
Starting a clothing brand is exciting.
But many first-time founders lose money because they complete the right tasks in the wrong order.
They design a full collection before calculating landed cost. They choose a launch date before confirming factory capacity. They book photography before approving samples. They budget for production but forget freight, GST, inspections, packaging and local delivery.
The safer approach is to treat your first collection like a controlled supply-chain project.
The recommended sequence is:
- Business plan
- Funding
- Manufacturer selection
- Sampling
- Bulk production
- Launch
Each stage provides the information needed for the next.
At Rudraa Exports, we support Australian founders through product planning, low-MOQ discussions, tech-pack review, sampling, factory-direct production, quality inspection, export documentation and shipment preparation from Tirupur, India.
Quick Answer
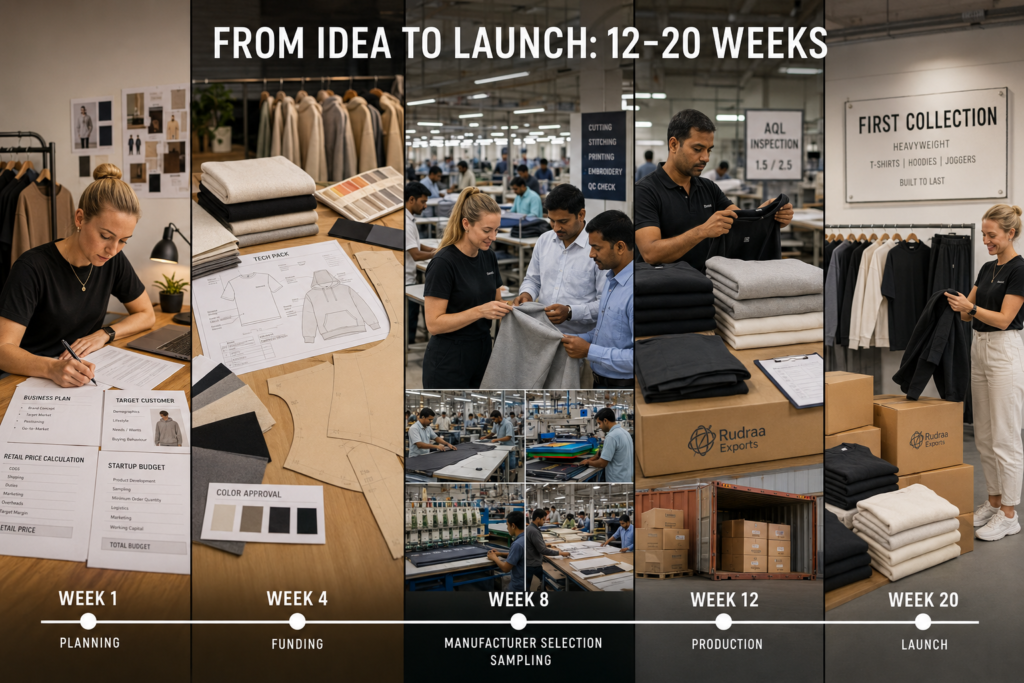
A realistic first offshore clothing launch for an Australian brand may take approximately 12–20 weeks from manufacturer outreach to landed stock, depending on sample revisions, fabric availability, production complexity and freight mode. Start with one hero product, calculate your maximum landed cost, secure enough funding for the full production cycle, verify the manufacturer, allow two to three sample rounds and approve a final pre-production sample before bulk begins.
Ready to plan your first production run? Contact Rudraa Exports to discuss your product, target MOQ, budget and Australian delivery timeline.
The Correct Order for Launching a Clothing Brand
| Stage | Main Decision |
|---|---|
| 1 | What product and customer are you building for? |
| 2 | Can you fund the complete production and launch cycle? |
| 3 | Which manufacturer can deliver the required quality and timeline? |
| 4 | Does the approved sample meet every specification? |
| 5 | Can bulk production pass the agreed quality gates? |
| 6 | Is the stock physically available before public launch? |
The uploaded guide recommends following the sequence of business plan, funding, manufacturer selection, sampling, production and launch to reduce financial and operational risk.
Step 1: Build a Simple Business Plan
Your first business plan does not need to be forty pages long.
It needs to answer the questions that control your product and cash flow.
Define One Hero Product
Start with one core product category, such as:
- Heavyweight T-shirt
- Oversized T-shirt
- Hoodie
- Sweatshirt
- Jogger
- Activewear set
- Polo shirt
- School or corporate uniform
Launching too many products creates more:
- Patterns
- Fabrics
- Samples
- Colours
- Labels
- MOQs
- Quality risks
- Cash tied in inventory
Define Your Customer
Be specific.
Instead of:
Young people who like fashion
Use:
Australian men and women aged 20–32 who buy premium oversized streetwear between AUD 60 and AUD 120.
Calculate Your Target Retail Price
Work backwards from the retail price.
Example
Target retail price: AUD 80
Target gross margin: 60%
Maximum total product cost: AUD 32
That AUD 32 must eventually cover the full commercial cost, not only the factory quotation.
Calculate Target Landed Cost
Your landed cost may include:
- Factory price
- Labels
- Packaging
- Freight
- Insurance
- Customs duty if applicable
- GST
- Customs brokerage
- Port charges
- Local delivery
- Inspection
- Bank fees
- Exchange-rate variation
The uploaded source stresses that founders should build a cost model before sampling because factory production is only one part of the true startup cost.
Create a One-Page Assumptions Sheet
Include:
| Planning Item | Your Target |
|---|---|
| Hero product | Example: 320 GSM hoodie |
| Target customer | Defined audience |
| Target retail price | AUD value |
| Target landed cost | AUD value |
| MOQ range | Example: 100–300 pieces |
| Number of colours | One or two |
| Size range | Example: XS–XXL |
| Launch window | Month or season |
| Maximum budget | Total cash exposure |
| Contingency | Two to three weeks |
Step 2: Secure Funding for the Complete Cycle
Clothing production requires cash before the brand begins selling.
Founders commonly pay for:
- Product development
- Tech packs
- Patterns
- Samples
- Fabric
- Trims
- Production deposit
- Production balance
- Inspection
- Freight
- GST
- Customs clearance
- Photography
- Website
- Packaging
- Marketing
The uploaded guide gives a broad planning range of approximately AUD 25,000–60,000 for a first Australian clothing launch once development, production, marketing and hidden costs are considered. Actual requirements vary significantly by product and order structure.
Illustrative First-Launch Budget
The following is a planning framework, not a fixed quotation.
| Cost Area | Lower Planning Range | Higher Planning Range |
|---|---|---|
| Tech packs | AUD 800 | AUD 1,600 |
| Pattern development | AUD 400 | AUD 2,000 |
| Sampling rounds | AUD 1,800 | AUD 2,100 |
| Bulk production | AUD 3,000 | AUD 24,000 |
| Fabric and trims | AUD 2,000 | AUD 9,000 |
| Freight, GST and clearance | AUD 1,500 | AUD 6,000 |
| Website, branding and content | AUD 2,500 | AUD 14,000 |
| Contingency | 10% | 20% |
Do Not Fund Only the Deposit
A factory deposit starts production.
It does not complete the order.
Before committing, ensure you can fund:
- Sample development
- Production deposit
- Production balance
- Inspection
- Freight
- Import costs
- Local delivery
- Contingency
Possible Funding Routes
Australian founders may consider:
- Personal savings
- Business savings
- Pre-orders
- Family or partner investment
- Business loan
- Crowdfunding
- Eligible government programs
- Equity funding
Eligibility, repayment risk and regulatory obligations should be checked separately before choosing a funding method.
Funding Rule
Do not publicly announce a firm launch date until you can fund:
Development + production commitments + freight + import costs + contingency
Step 3: Select the Right Manufacturer
Do not choose a manufacturer based only on the lowest quote.
The supplier must match:
- Product category
- MOQ
- Fabric requirements
- Quality expectations
- Compliance needs
- Production schedule
- Export market
- Communication requirements
Match the Manufacturing Cluster to the Product
| Product Category | Relevant Indian Manufacturing Strength |
|---|---|
| T-shirts and polos | Tirupur knitwear |
| Hoodies and sweatshirts | Tirupur fleece and knitwear |
| Joggers and knit activewear | Tirupur |
| Woven shirts and dresses | Delhi NCR and other woven hubs |
| Denim | Specialist denim clusters |
| Uniforms | Knit and woven institutional suppliers |
Manufacturer Vetting Checklist
Ask for:
- Legal business name
- Factory address
- Direct factory or trader confirmation
- Product capability
- Machinery list
- Monthly capacity
- Sample policy
- MOQ per style and colour
- Quality-control process
- Audit or certificate documents
- Fabric traceability
- Export experience
- Payment terms
- Inspection acceptance
The uploaded source recommends verifying quality systems, capacity, traceability and production scheduling before selecting a factory.
Ask for Comparable Product Evidence
A factory may be strong in basic T-shirts but weak in heavyweight hoodies.
Request evidence of products similar to yours in:
- Fabric
- GSM
- Construction
- Embroidery
- Fit
- Target market
Confirm Capacity in Writing
Ask:
- When can sampling start?
- When can fabric be booked?
- When is the cutting slot?
- What is the expected ex-factory date?
- Which holidays may affect production?
- What happens if fabric is delayed?
A capable factory may still be the wrong choice if it cannot meet your launch calendar.
Step 4: Prepare a Complete Tech Pack
A tech pack explains exactly what the factory must produce.
Without one, the factory must make assumptions.
Your Tech Pack Should Include
| Section | Details |
|---|---|
| Style information | Product name, code and version |
| Technical sketches | Front, back and internal details |
| Fabric | Composition, GSM and finish |
| Measurements | Size chart and tolerances |
| Construction | Stitch types and seam details |
| Trims | Labels, zippers, drawcords and buttons |
| Artwork | Print or embroidery size and placement |
| Colours | Pantone or approved colour reference |
| Care label | Required text and symbols |
| Packaging | Folding, bagging, stickers and cartons |
The uploaded guide identifies weak or missing tech packs as one of the main reasons first-time founders experience sample errors and substitutions.
Start with Reference Images When Necessary
Reference images can help explain direction, but they should be converted into measurable specifications.
Do not rely only on phrases such as:
- Make it oversized
- Use premium cotton
- Make the hood bigger
- Make the print slightly lower
- Use good-quality stitching
Replace them with:
- Finished chest width
- Body length
- Shoulder drop
- Sleeve opening
- GSM
- Fabric composition
- Print dimensions
- Placement measurements
- Stitch type
- Seam allowance
Step 5: Plan Two to Three Sample Rounds
Sampling is not a formality.
It is where your design becomes a repeatable production standard.
The uploaded guide recommends that first-time founders plan for approximately two to three sample rounds before approving bulk production.
Recommended Sampling Sequence
Round 1: Prototype Sample
Check:
- Overall shape
- Construction
- Fabric direction
- Basic measurements
- Design feasibility
Round 2: Fit Sample
Check:
- Chest
- Length
- Shoulder
- Sleeve
- Neck opening
- Hood shape
- Pocket position
- Comfort
- Size balance
Round 3: Pre-Production Sample
The PP sample should use the intended:
- Fabric
- GSM
- Colour
- Trims
- Labels
- Printing
- Embroidery
- Construction
- Packaging
Approve More Than Fit
Before bulk, confirm:
- Fabric hand-feel
- Shrinkage
- Colourfastness
- Measurements
- Stitching
- Print durability
- Embroidery placement
- Label accuracy
- Packaging
- Size grading
Sample Approval Rule
Do not write only:
Approved
Use:
PP sample approved for bulk production according to Tech Pack Version 4 dated 15 August 2026. No substitutions are permitted without written approval.
Step 6: Approve the Size Set
A medium sample may fit correctly while other sizes remain wrong.
A size set checks whether grading works across the range.
Size-Set Checks
- Chest progression
- Body-length progression
- Sleeve progression
- Neck opening
- Shoulder width
- Rise and inseam
- Waist stretch
- Hood scaling
- Pocket position
- Artwork placement
Keep the Approved Sample
The approved PP sample should become the physical production standard.
The factory and buyer should refer to the same approved version during:
- Bulk production
- Inspection
- Dispute resolution
- Repeat orders
Step 7: Lock the Production Calendar
Bulk production should begin only after:
- Tech pack is approved
- PP sample is approved
- Fabric is approved
- Colours are approved
- Artwork is approved
- Labels are approved
- Packing is approved
- Payment milestone is complete
Typical First-Order Production Stages
| Stage | Main Output |
|---|---|
| Material booking | Fabric and trims reserved |
| Fabric production or sourcing | Bulk material prepared |
| Dyeing and finishing | Approved colour and finish |
| Cutting | Panels cut to approved pattern |
| Sewing | Garments assembled |
| Printing or embroidery | Branding applied |
| Finishing | Threads, pressing and cleaning |
| Inspection | Measurements and workmanship checked |
| Packing | SKUs packed and labelled |
| Export | Shipment documents prepared |
Weekly Update Format
Ask the factory to send:
- Current production stage
- Completed quantity
- Delayed items
- Photos or videos
- Risks
- Corrective actions
- Updated ex-factory date
The uploaded guide recommends treating production as a project with milestone controls, payment stages and regular evidence-based updates.
Step 8: Use Milestone Payments
Avoid tying the entire order to one upfront payment.
A common planning structure may include:
| Stage | Payment Trigger |
|---|---|
| Initial deposit | Signed order and production slot |
| Development payment | Sample or pattern work |
| Mid-production payment | Fabric or production milestone |
| Final balance | Inspection pass and document approval |
Exact terms depend on:
- Order value
- Factory relationship
- Product complexity
- Credit arrangements
- Negotiated contract
Link Payment to Evidence
Before each payment, confirm the required milestone has been achieved.
Examples:
- Fabric purchased
- PP sample approved
- Bulk cutting started
- Production quantity confirmed
- AQL inspection passed
- Shipping documents prepared
Step 9: Install Quality-Control Gates
Do not rely only on a final inspection.
Recommended Quality Gates
Incoming Material Check
Inspect:
- Fabric composition
- GSM
- Shade
- Defects
- Shrinkage
- Trims
- Labels
Pre-Production Meeting
Confirm:
- Final specification
- Approved sample
- Pattern
- Measurements
- Fabric lot
- Artwork
- Packaging
- Production dates
Inline Quality Check
Inspect early production for:
- Measurements
- Stitching
- Shade consistency
- Print placement
- Embroidery
- Labels
- Workmanship
Pre-Shipment Inspection
Inspect:
- Quantity
- Measurements
- Defects
- Labels
- Packaging
- Cartons
- Barcodes
- Buyer specifications
The uploaded source recommends inline checks and a pre-shipment inspection before releasing goods.
Step 10: Plan Freight and Landed Delivery
Your launch date should be based on when stock reaches your warehouse, not when production finishes.
Sea Freight
Sea freight is usually suitable for:
- Planned bulk orders
- Better unit economics
- Larger quantities
- Non-urgent launches
Air Freight
Air freight is usually suitable for:
- Samples
- Small pilot quantities
- Urgent top-ups
- Influencer or photoshoot pieces
- Partial emergency delivery
The uploaded guide uses a Chennai-to-Melbourne sea-freight planning range of approximately 25–35 days, subject to routing, carrier schedules and disruptions.
Add Time for More Than Transit
Also allow time for:
- Factory-to-port transport
- Export clearance
- Vessel departure
- Transshipment
- Australian customs clearance
- Port handling
- Local delivery
- Warehouse receiving
Freight Rule
Do not book your launch event for the same day the shipment is expected to arrive.
Keep a warehouse and inspection buffer before launch.
The Realistic 12–20 Week Launch Timeline
The following is a practical planning framework. Complex products or multiple sample revisions may take longer.
| Week | Milestone |
|---|---|
| 1–2 | Product plan, factory outreach and initial costing |
| 2–4 | Manufacturer vetting and tech-pack completion |
| 4–6 | First sample development |
| 6–8 | Fit comments and second sample |
| 8–10 | PP sample, colour and material approval |
| 10–16 | Bulk production and inline QC |
| 16–17 | Final inspection and packing |
| 17–20 | Sea freight, clearance and Australian delivery |
The uploaded source presents a 12–20 week planning window from early factory engagement to landed goods, depending on sampling, production and shipping conditions.
Faster Timeline
A faster launch may be possible when:
- The product is simple
- Stock fabric is used
- One colour is selected
- Samples are approved quickly
- Production capacity is available
- Air freight is used
Longer Timeline
A launch may take longer when:
- Fabric is custom developed
- Multiple colours are used
- Prints or embroidery require revisions
- Three or more samples are needed
- Production occurs during peak season
- Sea freight is disrupted
- Inspection fails
First Clothing Order Readiness Checklist
| # | Requirement |
|---|---|
| 1 | Hero product selected |
| 2 | Target customer defined |
| 3 | Retail price decided |
| 4 | Target landed cost calculated |
| 5 | Maximum budget confirmed |
| 6 | Contingency included |
| 7 | Funding available for full cycle |
| 8 | Tech pack completed |
| 9 | MOQ confirmed per style and colour |
| 10 | Manufacturer verified |
| 11 | Capacity confirmed |
| 12 | Sample rounds budgeted |
| 13 | Fit sample approved |
| 14 | Size set approved |
| 15 | PP sample approved |
| 16 | Payment milestones agreed |
| 17 | Inline QC planned |
| 18 | Pre-shipment inspection planned |
| 19 | Freight mode selected |
| 20 | Launch date includes delivery buffer |
Common First-Time Founder Mistakes
1. Starting with Too Many Products
A wide range multiplies cost and complexity.
Start with one hero product and one supporting product.
2. Choosing the Lowest Quote
A low quote may exclude:
- Labels
- Packaging
- Testing
- Better trims
- Inspection
- Export costs
3. Skipping the Tech Pack
Without clear documentation, the factory must make assumptions.
4. Approving Samples Too Quickly
A visually attractive sample may still have:
- Shrinkage
- Poor grading
- Incorrect fabric
- Weak seams
- Wrong labels
5. Ignoring Landed Cost
FOB price is not the final cost in Australia.
6. Setting the Launch Date Too Early
Marketing should follow the production schedule, not control it.
7. Paying Too Much Upfront
Payments should be connected to clear milestones.
8. Skipping Inspection
Defects are cheaper to correct before goods leave the factory.
How Rudraa Exports Supports First-Time Australian Founders
Rudraa Exports supports startup brands with factory-direct clothing manufacturing from Tirupur, India.
Products Supported
- T-shirts
- Heavyweight T-shirts
- Polo shirts
- Hoodies
- Sweatshirts
- Joggers
- Activewear
- Kidswear
- Babywear
- Nightwear
- Uniforms
- Corporate apparel
- Private-label knitwear
Startup Support
- Product brief review
- Tech-pack guidance
- Fabric and GSM recommendations
- MOQ planning
- Sample development
- Fit and size-set coordination
- Colour and lab-dip approval
- Print and embroidery support
- PP sample approval
- Inline QC updates
- AQL inspection support
- Export packing
- Documentation
- Shipment planning
- Repeat-order support
Why Factory-Direct Matters
A factory-direct relationship can provide:
- Clearer communication
- Faster technical decisions
- Better cost visibility
- Easier sample corrections
- Better production updates
- Clearer quality accountability
- Reduced risk of hidden sourcing layers
Ready to plan your first collection? Speak with Rudraa Exports and share your product idea, target quantity, budget, fabric preference and Australian delivery date.
FAQ: Starting a Clothing Brand in Australia
1. How much does it cost to start a clothing brand in Australia?
The amount varies widely. A professionally developed first collection may require tens of thousands of Australian dollars once sampling, production, freight, marketing and contingency are included.
2. How long does it take to launch a clothing brand?
A realistic offshore manufacturing timeline may be approximately 12–20 weeks, depending on samples, product complexity, factory capacity and freight.
3. What product should I launch first?
Start with one product that clearly represents the brand and is easy for customers to understand, such as a signature T-shirt or hoodie.
4. Do I need a tech pack?
A tech pack is strongly recommended because it converts your design into measurable manufacturing instructions.
5. How many samples should I expect?
First-time founders should usually plan for two or three rounds, although simple products may require fewer and complex products may require more.
6. What is a PP sample?
A pre-production sample is the final garment approved before bulk production begins. It should represent the intended fabric, fit, trims, labels and construction.
7. Should I use sea freight or air freight?
Sea freight is normally more economical for bulk orders. Air freight is faster but can substantially increase landed cost.
8. Should I pay the factory in full before production?
Full upfront payment increases buyer risk. Milestone payments linked to samples, production evidence and inspection are generally safer.
9. What quality checks should I use?
Use material checks, PP approval, inline inspections and a final pre-shipment inspection based on documented defect standards.
10. Can I start with a low MOQ?
Low-MOQ production may be possible for simple products using stock fabrics, limited colours and standard trims.
11. Can Rudraa Exports help a first-time founder?
Yes. Rudraa can support product planning, sampling, low-MOQ discussions, private labels, production, inspection and export preparation.
12. What should I send for a quote?
Send your product reference or tech pack, fabric, GSM, quantity, colours, sizes, print or embroidery details, packaging needs and Australian delivery location.
Conclusion
Launching a clothing brand successfully depends on doing things in the correct order.
Begin with one clear product and a realistic cost model. Secure funding for the complete cycle. Verify the manufacturer. Create a detailed tech pack. Allow enough time for sampling. Approve a final PP sample. Control bulk production through milestones and inspections. Set the launch date only after accounting for freight and delivery buffers.
Your first collection should not be managed as a collection of disconnected creative tasks.
It should be managed as one controlled production project.
Rudraa Exports helps Australian founders move from product concept to finished garments through factory-direct manufacturing, sampling, private-label development, quality control and export support from Tirupur, India.
Visit rudraaexports.com or contact the Rudraa Exports team to discuss your first clothing-brand production plan.
Related reading
Low MOQ Clothing Manufacturing for Australian Startup Brands
How to Launch Your Clothing Brand with Small-Batch Production: 50–200 Unit Guide
How to Start a Clothing Brand with No Experience: Complete Manufacturing Guide 2026
Small Batch Clothing Manufacturers in India: Low MOQ Options for Startups